
eLearning Design: Utilizing 360 Images in Adobe Captivate
The experience has shown us that utilizing 360 images is an excellent immersive learning technique to connect eLearning to the real world, turning challenging raw materials into exciting learning experiences. Our courses have greatly benefited from the incorporation of 360 images, and this has been recognized both by our happy clients and the eLearning industry, as evidenced by our Adobe Design award
The eWyse ID team (ID = Instructional Design) brings you tips on how to implement the 360 images in eLearning courses using the Adobe Captivate software.
About 360 images
360 images are images that enable the user to rotate through the screen in full 360-degree mode. Up-down-left-right, all in a circle.
“360-degree,” or full/spherical panoramic, denotes an image that captures a complete spherical view of your surroundings; from the sky directly above you to the ground directly beneath you, every angle is captured.”
University Center for Teaching and Learning: Everything You Need to Know to Take and Use Your Own 360-degree Photos
The easiest way to capture a 360-degree photo is with a full-degree camera. The camera usually has multiple wide-angle lenses that can capture and render the whole image.
The other way to shoot it is via a DSLR camera or a phone. The image is made while taking multiple shots as the device is rotated.
360 images can be utilized on many sites or programs that have a built-in feature to view those images, sites such as Facebook, Photoshop, Klapty, Orbix 360, or software programs such as Adobe Captivate and Articulate 360. One way of utilizing them is in Virtual Reality (VR) tours, which we have done in Revival project.
Virtual Tour with 360 Images in Project Revival
With the Interreg’s Project Revival, the goal was to restore and reuse the Adriatic landscape’s lost cultural legacy. The mission was to make a tour of an abandoned site and relive some of the lost stories.
The idea of the project was to have an interactive walk through the place like in a museum and the tool Adobe Captivate enabled this idea. It’s an authoring tool used to create eLearning content, including software simulations, branched scenarios, and randomized quizzes.
Here’s what we think of Adobe Captivate with 360 images
We chose Adobe Captivate to integrate 360 images in a course, and it hasn’t let us down. Without the need for programming, you can effortlessly produce a wide range of fully responsive eLearning content.
In this particular project, the result was a Virtual Museum. The user had a depiction of looking around the place with the mission of finding hotspots that displayed pictures or videos of people and surrounding areas – from the past.
This VR technology introduced realistic scenery and objects that helped users feel immersed in their surroundings, having launched a whole new level of online learning.
eLearning Course Production in Adobe Captivate
Here is a step-by-step guide on how to create interactive 360 images in Adobe Captivate
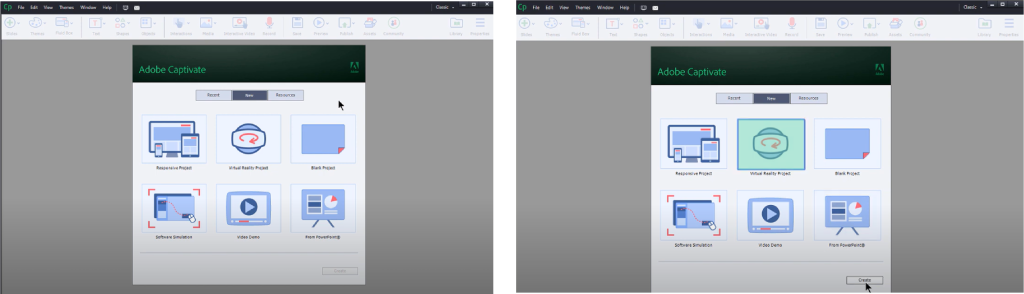
Step 1.Choose the option of opening a project in Adobe Captivate that allows one to read 360-degree images.
Pic 1. Opening pop to choose a type of project in Adobe Captivate
Step 2. Choose the option of a Virtual Reality project. It opens a palette with the icon for uploading a 360-degree image. After choosing the desired 360 images, the user can rotate them in all directions.
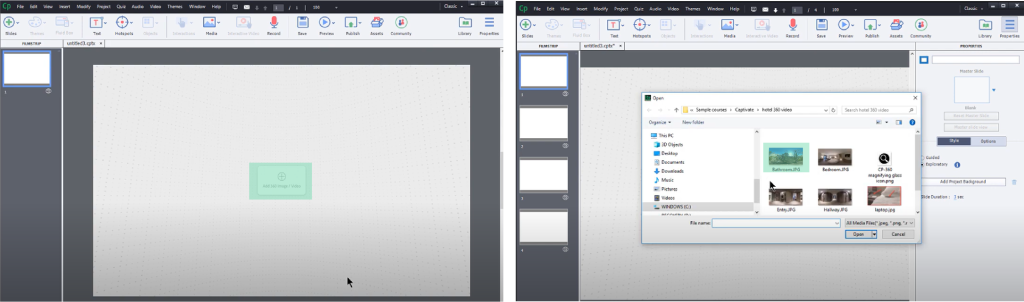
Pic 2. Virtual Reality project and opening the 360 image
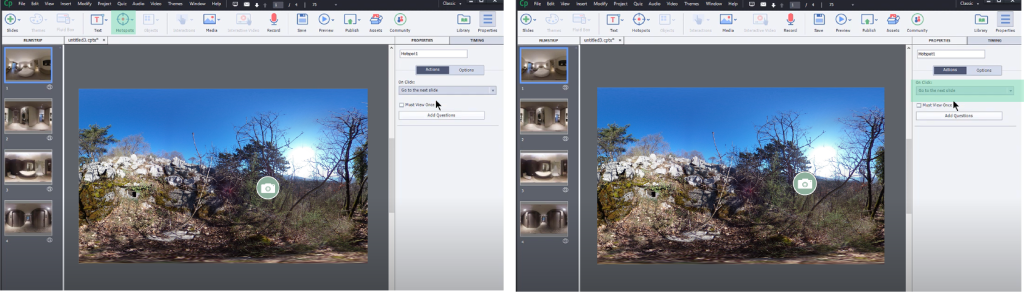
Step 3. Add interactions to the site by adding hotspots. The hotspots are depicted as icons and can be added anywhere on the image. While inserting each icon, the user can choose between the hotspot’s many interactivity options: they vary from displaying a picture or a video to taking the user to the next or previous screen (e.g. in the next/previous room).
From our point of view, getting to know one’s way around Adobe Captivate requires little effort: the program uses the drag-and-drop mechanism for most actions, thus the final result can be achieved in a reasonable amount of time, with no huge effort. Actually, we found that the greatest effort was actually acquiring a 360 image and adapting it to serve our purpose. After that, managing the program seemed quite simple.
Conclusion: 360 Images Spice Up Your eLearning Content
Utilizing 360 images is an effective way to produce a virtual tour of any site. If your Learning Architect envisions an image that will perfectly serve the purpose of the course, we can find no cons of utilizing 360 images in your eLearning (except if you don’t have a 360 image to begin with!):
- The inclusion of interactive elements adds an element of adventure to the tour, as users are encouraged to seek out new hotspots and learn about forgotten stories.
- Informative and relevant hotspots on your 360 image will equip users with what they need to learn.
- The overall visual appeal of the course is improved, which is – let’s face it – an important attention-grabber.
This immersive technique can be utilized in almost any sector, the most prominent ones being tourism and retail. If you’re curious to learn how we have helped other clients with 360 experience, check out our 360 experience service page.
Author: Marija Šimunić
Editor: Tamara Tomek